2025-03-21
Stream Processing with Apache Flink. Part-3
Consuming CDC logs from a backend database to an Iceberg table using Flink

Stream Processing with Apache Flink. Part-3: CDC to Iceberg Table
This is a series of blog posts about Stream processing with Apache Flink. We'll dive into the concepts behind the Flink engine, creating streaming data pipelines, packaging and deploying Flink applications and how it integrates with external systems like Kafka, Snowflake and cloud providers.
Here is the entire series so far. I'll keep updating this as and when they're published:
- Stream Processing with Apache Flink. Part-1
- Stream Processing with Apache Flink. Part-2: DataStream Hands-on with Java
- Stream Processing with Apache Flink. Part-3: CDC to Iceberg Table (You're here)
- Stream Processing with Apache Flink. Part-4: Datastream Enrichment
Contents
- Introduction
- Infrastructure Setup
- Setting up the database
- Verifying the changelogs in Kafka
- Creating the Iceberg table
- Flink Application
- Deploying the Flink application
- Querying the Iceberg table
- Conclusion
Introduction
A common use case in data engineering is to capture changes in a backend production database and replicate them to a data lake or data warehouse. This is often referred to as Change data capture (CDC). In this post, we will explore how to use Apache Flink to capture changes from a Postgres database using Debezium and write them to an Iceberg table. This will allow us to create a near real-time data pipeline that can be used for analytics and reporting.
Iceberg is a table format for data lakes that provides features like schema evolution, time travel and ACID transactions. It is an open source spec that describes how large analytic datasets are stored in files. It can be queried by engines like Apache Spark and Trino. For a detailed overview of the Iceberg table format, please refer to its documentation. I plan to write a detailed post on Iceberg in the future, so stay tuned for that.
All code for this post is available on GitHub.
Infrastructure Setup
The infrastructure required for this post will be created using Kubernetes. Most production environments use Kubernetes to deploy and manage applications (EKS on AWS, GKE on Google Cloud and AKS on Azure). It will manage the deployment, scaling and operations of our application containers across a local cluster.
Pre-requisites
To create the infra and run the code, you will need the following tools installed on your local machine:
- Docker
- Docker desktop - for creating a local Kubernetes cluster
- kubectl - command line tool for interacting with Kubernetes
- Helm - package manager for Kubernetes
- IDE - for building the Flink application
- Java 11 - for querying the Iceberg table using Spark
- Maven - (Optional) for compiling and running the Iceberg setup. This can be also be run directly from the IDE.
You will have to download Java 17 for building the Flink application in IntelliJ. For running Spark locally, I have installed Java 11.
After installing Docker desktop, you will have to enable Kubernetes in the settings. This will create a local Kubernetes cluster on your machine. You can check if it is running by executing the following command:
1kubectl cluster-info
2
Components
We will be installing the following components on our local Kubernetes cluster:
- Postgres database
- Minio (S3 compatible storage)
- Flink operator (for deploying Flink applications)
- Kafka operator
- Kafka cluster
- Kafka connect cluster
- Kafka UI (Provectus)
- Postgres connector (for capturing changes from Postgres)
All manifests are present in the k8s directory of the GitHub repo. You can use the following command to create the Kubernetes resources:
1make setup-infra
2
This will create all the required resources. I recommend using k9s, a terminal based UI for managing Kubernetes clusters.
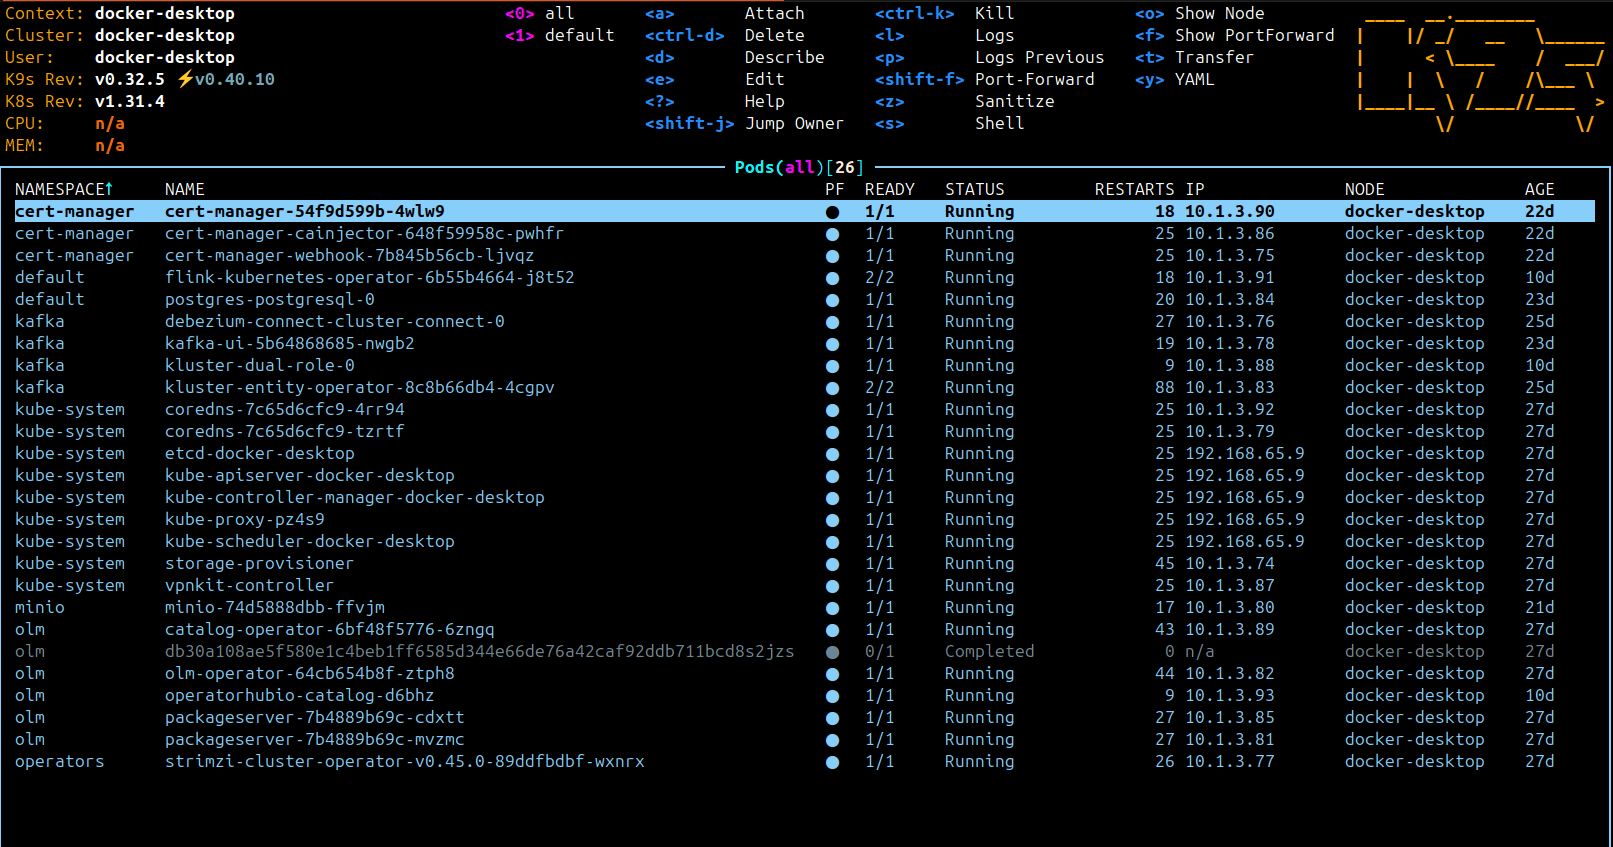
I will not be diving deep into the setup of each component. If you run into any issues, please feel free to create an issue on the GitHub repo or leave a comment down below. I will be happy to help you out.
Note: We'll be using Minio(S3) for storing Flink checkpoints and other metadata. You can forward ports 9000(endpoint) and 9001(console) for Minio. Once the infrastructure is setup, you will have to create a bucket specifically for Flink and generate access keys for it. Keep these handy as we'll need them for configuring the Flink application as well.
Setting up the database
We have created a database called cdciceberg while setting up Postgres. We'll try to simulate a production environment by creating a table called customers in this database. Any changes to this table will be written to an Iceberg table. I've provided a script at scripts/datagen.py to create and insert data into this table. It generates exactly 10000 records using the Faker library.
The schema of the table is as follows:
1CREATE TABLE IF NOT EXISTS customers (
2            id SERIAL PRIMARY KEY,
3            name VARCHAR(100),
4            date_of_joining DATE,
5            updated_at TIMESTAMP,
6            address TEXT
7        )
8
To run the script:
1make db-setup
2
It requires a virtual environment with relevant packages installed. If you didn't set one up yet, you can execute the following command first:
1make env-setup
2
In case you want to directly execute a SQL script to create the table and insert the records, you will find it under scripts/sql/customer_data.sql.
Verifying the changelogs in Kafka
With the database setup complete, we can now verify if the changes are being produced to Kafka. We installed a Kafka UI to inspect the CDC topics and messages. To view this UI, you will have to forward the port of the Kafka UI service to your local machine:
1kubectl -n kafka port-forward svc/kafka-ui 8080:8080
2
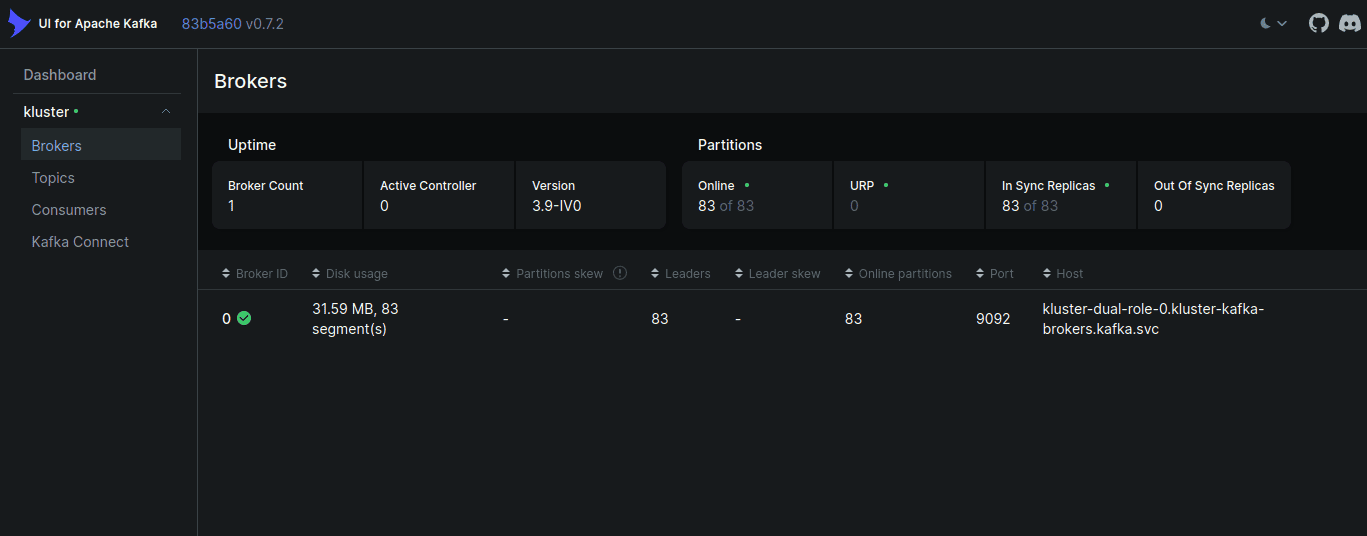
You should see both the Kafka broker and the Kafka connect cluster running in the UI.
For reference:
Kafka broker
Kafka connect
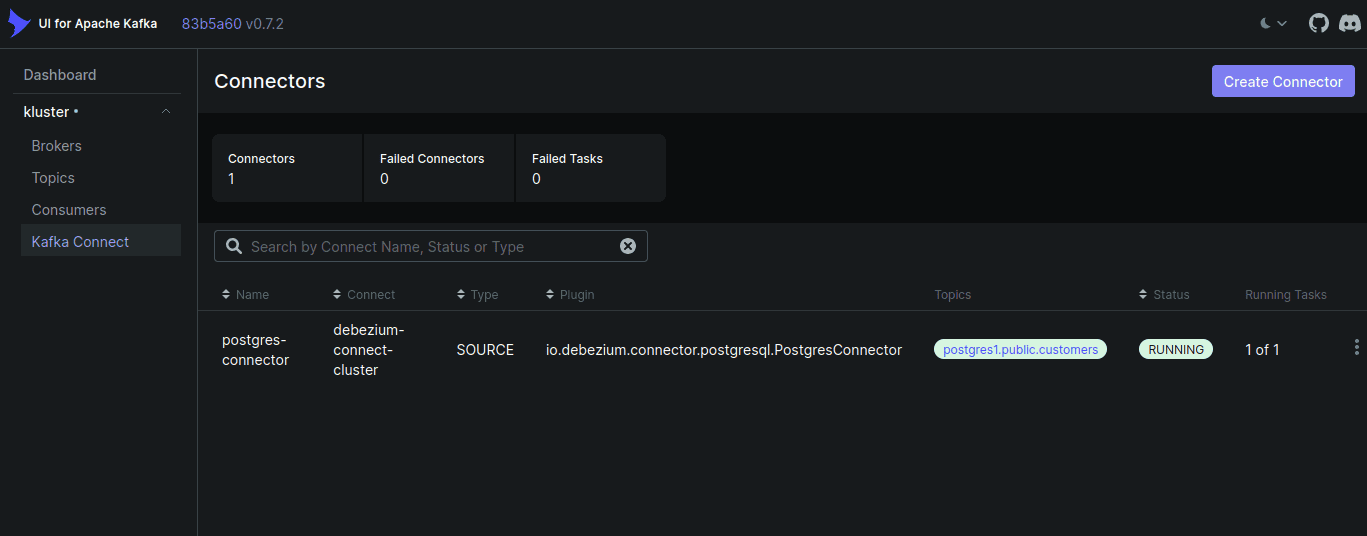
The topic pattern for the Postgres connector is postgres1.<schema>.<table_name>. In our case, it will be postgres1.public.customers.
Debezium produces changelogs in the form of JSON messages. The following is an example of a message produced to this topic:
1{
2  "before": null,
3  "after": {
4    "id": 10001,
5    "name": "Jeffrey Yoder Jr.",
6    "date_of_joining": 18540,
7    "updated_at": 1640888320793726,
8    "address": "Berlin, Germany"
9  },
10  "source": {
11    "version": "3.0.7.Final",
12    "connector": "postgresql",
13    "name": "postgres1",
14    "ts_ms": 1742547174485,
15    "snapshot": "false",
16    "db": "cdciceberg",
17    "sequence": "[\"34815336\",\"41720960\"]",
18    "ts_us": 1742547174485993,
19    "ts_ns": 1742547174485993000,
20    "schema": "public",
21    "table": "customers",
22    "txId": 882,
23    "lsn": 41720960,
24    "xmin": null
25  },
26  ...
27  "op": "c",
28  ...
29}
30
The before field contains the old record before the change, and the after field contains the new record after the change. The source field contains metadata (database, schema, table etc.). The op field indicates the type of operation (insert, update, delete) that caused the change.
To make sure we're getting the updates from the database, let's update a record in the customers table. You can port-forward the Postgres service to your local machine and use pgAdmin or any other SQL client to execute queries. I prefer the SQLTools extension in VSCode.
To port forward the Postgres service:
1kubectl port-forward svc/postgres-postgresql 5432:5432
2
Update the record with id 10000:
1UPDATE customers SET address = 'Berlin, DE' WHERE id = 10001;
2
You should see a new message in the Kafka topic with the updated record:
1{
2  "before": {
3    "id": 10001,
4    "name": "Jeffrey Yoder Jr.",
5    "date_of_joining": 18540,
6    "updated_at": 1640888320793726,
7    "address": "Berlin, Germany"
8  },
9  "after": {
10    "id": 10001,
11    "name": "Jeffrey Yoder Jr.",
12    "date_of_joining": 18540,
13    "updated_at": 1640888320793726,
14    "address": "Berlin, DE"
15  },
16  ...
17  "op": "u", # as the record was updated
18  ...
19}
20
Creating the Iceberg table
Now that we have the changelogs in Kafka, we can create an Iceberg table to store this data and make it available for analytics. We will be using Minio as our S3 compatible storage.
To create the Iceberg table, make sure you
- provide the
S3_ACCESS_KEYandS3_SECRET_KEYgenerated from the Minio console, at the top of the Makefile - port-forward the Minio service to your local machine:
1kubectl -n minio port-forward svc/minio 9000:9000
2
Create the table:
1make iceberg-setup
2
This compiles and executes the com.github.abyssnlp.setup.IcebergSetup class. This class:
- Creates a Hadoop configuration with S3 connection parameteres and S3A file system implementation.
- Creates a Hadoop catalog pointing to the S3 warehouse path
s3a://data/. This should be created beforehand using the Minio console. - Creates a namespace(database) called
default_database - Defines an Iceberg schema that matches the Postgres table structure:
id- Integername- Stringdate_of_joining- Dateupdated_at- Timestampaddress- String
- Defines the partitioning schema for the table (partitioned by day based on
updated_atfield) - Creates the Iceberg table
customersin thedefault_databasenamespace with the above schema if it doesn't exist already. The table properties are set enable upserts.
1properties.put("write.upsert.enabled", "true");
2
Note: In hindsight, the partitioning schema could be based on the date of joining as it doesn't change when a customer record gets updated, and records are upserted into the target iceberg table.
The table should now be created in the S3(Minio) bucket. You can verify this by checking the Minio console. The Iceberg table will be created in the s3a://data/default_database/customers/ path. The Iceberg table metadata will be stored in the metadata directory, and the data files will be stored in the data directory. As we haven't inserted any data yet, we will only have the Iceberg metadata files in the metadata directory.
Flink Application
Next, we will create a Flink application that will read the changelogs from the Kafka topic and write them to the Iceberg table. We will be using the Java DataStream API. The dependencies for our application are present in the pom.xml file at the root of the repository.
JSON Deserializer
The data we're going to get from our Debezium changelogs is in JSON format. We will need to deserialize the JSON message into a Flink RowData type. The main method in our deserializer class is:
1@Override
2    public RowData deserialize(byte[] message) throws IOException {
3        if (message == null) {
4            return null;
5        }
6
7        try {
8            JsonNode rootNode = objectMapper.readTree(message);
9
10            // debezium op
11            String op = rootNode.get("payload").path("op").asText();
12            RowKind rowKind = getRowKind(op);
13
14            JsonNode dataNode = op.equals("d") ?
15                    rootNode.path("payload").path("before")
16                    : rootNode.path("payload").path("after");
17
18            GenericRowData rowData = new GenericRowData(5);
19            rowData.setRowKind(rowKind);
20
21            rowData.setField(0, dataNode.path("id").asInt());
22            rowData.setField(1, StringData.fromString(dataNode.path("name").asText()));
23            rowData.setField(2, dataNode.path("date_of_joining").asInt());
24            rowData.setField(3, TimestampData.fromEpochMillis(dataNode.path("updated_at").asLong() / 1000));
25            rowData.setField(4, StringData.fromString(dataNode.path("address").asText()));
26
27            return rowData;
28        } catch (Exception e) {
29            throw new IOException("Failed to deserialize debezium JSON message ", e);
30        }
31    }
32
-
We parse the
payloadfield of the Debezium JSON message to get theopfield. This indicates the type of operation (insert, update, delete) that caused the change. -
Create a
GenericRowDataobject to hold the deserialized data. -
Get the
RowKindbased on theopfield.
1return switch (op) {
2            case "c", "r" -> RowKind.INSERT;
3            case "u" -> RowKind.UPDATE_AFTER;
4            case "d" -> RowKind.DELETE;
5            default -> throw new IllegalArgumentException("Unknown debezium operator type: " + op);
6        };
7
- Set the fields of the
GenericRowDataobject. The fields are set in the same order as the schema of the Iceberg table.
Kafka Source
We will now use this deserializer to create a Kafka source from the changelogs topic. To create a KafkaSource:
1KafkaSource<RowData> source = KafkaSource.<RowData>builder()
2                .setBootstrapServers(kafkaBootstrapServers)
3                .setTopics(kafkaTopics)
4                .setGroupId(kafkaGroupId)
5                .setStartingOffsets(OffsetsInitializer.earliest())
6                .setValueOnlyDeserializer(new DebeziumJsonDeserializer())
7                .setProperty("enable.auto.commit", "false")
8                .setProperty(ConsumerConfig.AUTO_OFFSET_RESET_CONFIG, "earliest")
9                .setProperty(ConsumerConfig.ISOLATION_LEVEL_CONFIG, "read_committed")
10                .build();
11
We need to provide the bootstrap servers, topics and groupId. This can be provided as environment variables to the application at runtime in production.
In our application, these secrets will be mounted as environment variables. The secrets.yml at the root of repository contains the relevant base64 encoded secrets. Alternatively, for development, you can also hardcode them in the application itself.
We also create a DataStream from this source:
1DataStream<RowData> sourceStream = env
2                .fromSource(source, WatermarkStrategy.noWatermarks(), "Kafka Source")
3                .uid("kafka-cdc-source")
4                .name("Debezium CDC Source");
5
Iceberg Sink
With our stream setup, we can now create an Iceberg sink to write this data to the Iceberg table we'd created earlier. As we did during the table setup, we need to create the HadoopCatalog. We'll also create the TableLoader and FlinkSink to sink the data to our table on S3.
1TableLoader tableLoader = TableLoader.fromHadoopTable(
2                catalog.loadTable(tableIdentifier).location(),
3                hadoopConf
4        );
5
6
7FlinkSink.forRowData(sourceStream)
8        .tableLoader(tableLoader)
9        .writeParallelism(1)
10        .upsert(true)
11        .equalityFieldColumns(List.of("id", "updated_at"))
12        .append();
13
The equalityFieldColumns is crucial when using upserts as it is used to identify rows for updating. The columns id and updated_at here form the composite key that uniquely identifies records in our table. When a record with the same equality fields arrives:
- If the record is an insert, it will be inserted into the table.
- If the record is an update, it will be updated in the table.
- If the record is a delete, it will be deleted from the table.
- If the record is a tombstone, it will be ignored.
Note: In our partitioning spec, we've chosen to partition the table by day based on the
updated_atfield. However, this is not the right approach as theupdated_atfield changes when a record is updated. This means that the record will be written to a different partition every time it is updated. A better approach would be to partition the table bydate_of_joiningas this field doesn't change when a record is updated. This will ensure that the records are written to the same partition every time they are updated. Feel free to change this in the code and test it out.
Deploying the Flink application
The Flink application can be deployed using the Flink operator. The operator takes care of managing the Flink cluster and application lifecycle. When we setup the infra earlier, we installed the Flink operator in our Kubernetes cluster.
Flink deployments are defined in a YAML manifest, similar to Kubernetes deployments. We will package our application and build a docker image. This docker image will be used by our flink deployment to run our application. You can find a dockerfile at the root of the repository. Optionally, to simulate production workloads, we will push this dockerfile tagged with our current git commit hash to the Docker hub registry. On cloud providers, this would be pushed to a private container registry like ECR(AWS) or GCR(Google Cloud).
1make build-flink-job docker_username=abyssnlp # provide your own docker username here
2
Next, to deploy this application into the Flink cluster, you will find a deploy.yml at the root of the repository that contains the deployment manifest. We provide the image name and tag, the Flink version, Flink configuration (parallelism, restart strategy, memory settings, JVM options, etc.) and the environment variables required for the application. The environment variables are mounted as secrets in the deployment. You can find the secrets in the secrets.yml file at the root of the repository. We have also enabled checkpointing and savepoints for the application. These would be saved in the S3(Minio) bucket we created earlier.
Make sure you provide ample memory and CPU resources for the task manager. Here, I've provided 2 CPU cores and 10Gi memory to my taskmanager.
1  jobManager:
2    resource:
3      memory: "2Gi"
4      cpu: 1
5  taskManager:
6    resource:
7      memory: "10Gi"
8      cpu: 2
9  job:
10    jarURI: local:///opt/flink-jobs/flink-cdc-iceberg-1.0.jar
11    parallelism: 1
12    upgradeMode: savepoint
13
A really good article on deploying Flink applications on Kubernetes can be found here.
To deploy the application:
1make deploy-flink-job docker_username=abyssnlp # provide your own docker username here
2
This will apply the secrets (required for environment variables) and the deployment manifest. To forward the Flink UI port to your local machine:
1kubectl port-forward svc/flink-cdc-iceberg-rest 8081:8081
2
You can access the Flink UI at localhost:8081. The Flink UI provides a lot of useful information about the application, including the job status, task manager status, and metrics.
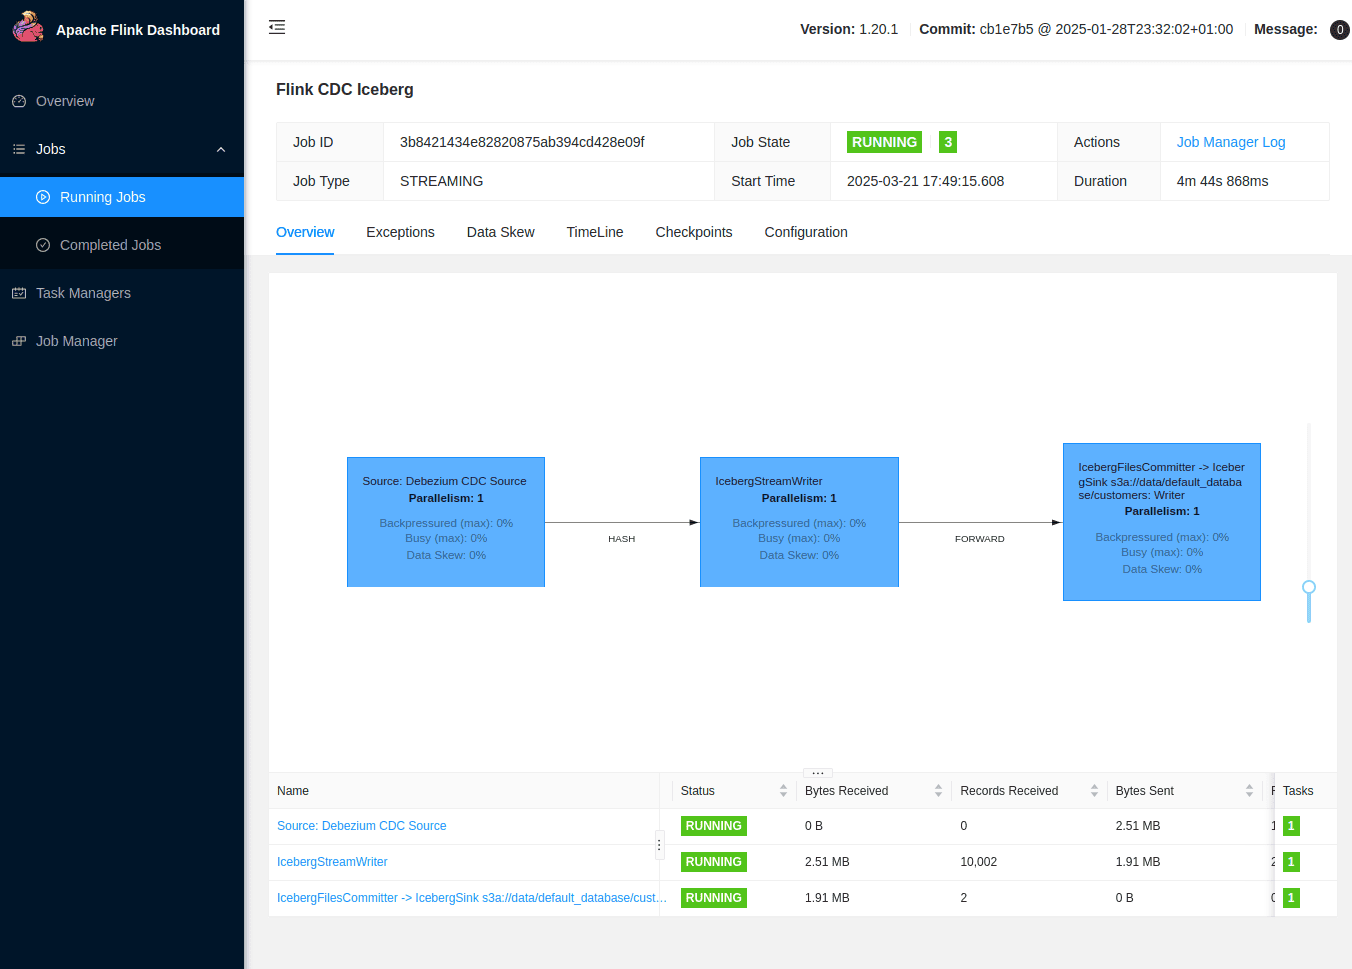
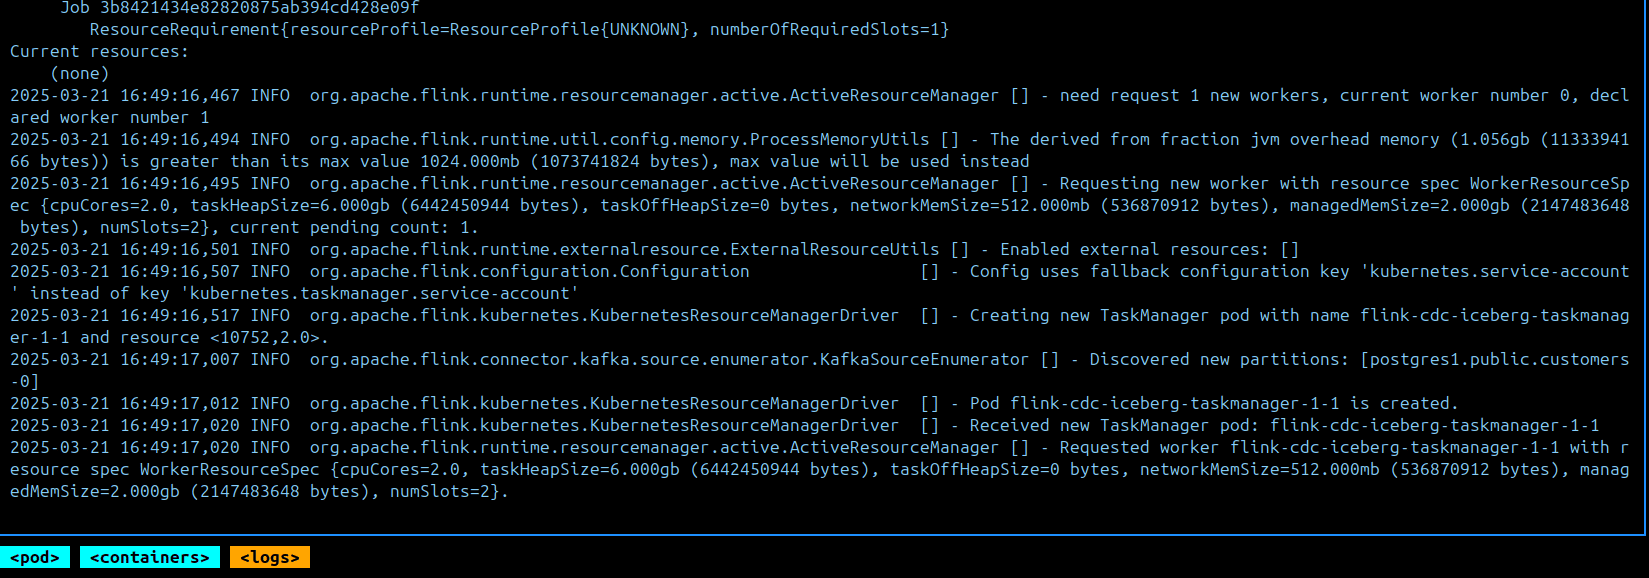
Its also quite useful to monitor the job manager pod logs to see the application status and any errors that might occur. As an example, here you can see the task manager starting up and registering with the job manager:
Querying the Iceberg table
Now that our Flink application is running, we can query our Iceberg table. Initially, I tried to query the Iceberg table using duck-db with the Iceberg extension but it cannot yet read an Iceberg table with upserts(Github Issue). If you get it working, please let me know in the comments below.
Using Apache Spark
I chose to query the Iceberg table using Apache Spark. I installed spark locally into my virtual environment. The script to read the table along with the dependencies is present in the scripts directory. You can query the table using the following command:
1make read-table
2
This activates the virtual environment and runs the script: scripts/read_customers_table.py. Make sure you setup the virtual environment as described in the datagen step. It also downloads the required jars for Iceberg and S3 into the scripts/jars directory.
1spark = SparkSession.builder \
2    .appName("Iceberg Reader") \
3    .config("spark.sql.extensions", "org.apache.iceberg.spark.extensions.IcebergSparkSessionExtensions") \
4    .config("spark.sql.catalog.iceberg", "org.apache.iceberg.spark.SparkCatalog") \
5    .config("spark.sql.catalog.iceberg.type", "hadoop") \
6    .config("spark.sql.catalog.iceberg.warehouse", "s3a://data") \
7    .config("spark.hadoop.fs.s3a.endpoint", "http://localhost:9000") \
8    .config("spark.hadoop.fs.s3a.access.key", os.getenv("S3_ACCESS_KEY")) \
9    .config("spark.hadoop.fs.s3a.secret.key", os.getenv("S3_SECRET_KEY")) \
10    .config("spark.hadoop.fs.s3a.path.style.access", "true") \
11    .config("spark.hadoop.fs.s3a.impl", "org.apache.hadoop.fs.s3a.S3AFileSystem") \
12    .config("spark.sql.defaultCatalog", "iceberg") \
13    .config("spark.jars", ",".join(jars)) \
14    .getOrCreate()
15
The environment variables are exported at the top of the Makefile so make sure you provide the correct values for your local Minio instance.
The script executes a simple SQL query to read the Iceberg table and print the results. You can modify the query to suit your needs.
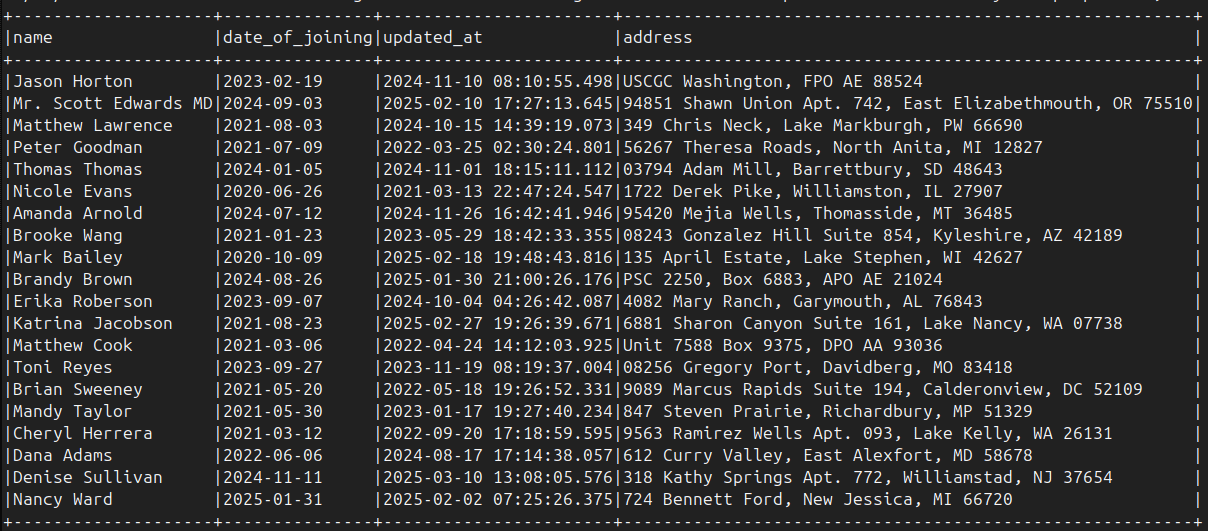
Here I will print the first 20 records from the Iceberg table:
Updating records
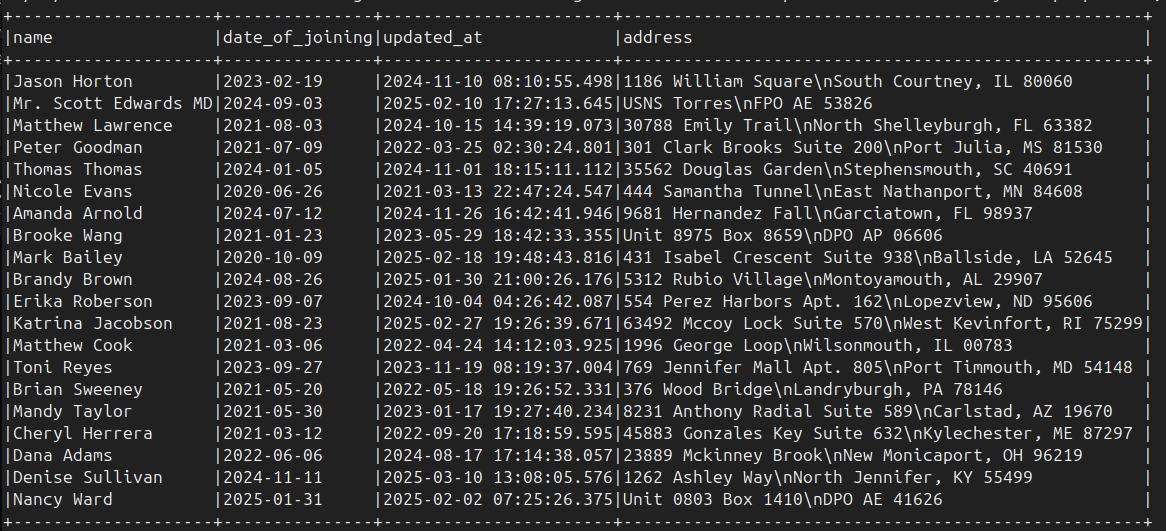
Let's update a few records in the customers table and see them being reflected in the Iceberg table. I have provided a script to update the records at scripts/update_records.py. This script updates the address field of the first 20 records(by id). You can modify it to change the update logic.
To run the update script:
1make update-records
2
This will update the records in the customers table and produce changelogs to the Kafka topic. The Flink application will read these changelogs and write them to the Iceberg table. You can verify this by running the read script again. You should see the updated records in the Iceberg table after some time.
Note: If you've run the generate data script multiple times, the
idfield will keep incrementing.
Conclusion
In this post, we explored how to use Apache Flink to capture changes from a Postgres database using Debezium and write them to an Iceberg table. We created a local Kubernetes cluster and deployed the required components like Postgres, Kafka, Kafka connect and the Flink operator. We then created a Flink application that reads the changelogs from the Kafka topic and writes them to the Iceberg table. Finally, we queried the Iceberg table using Apache Spark.
Implementing CDC pipelines with Flink and Iceberg is just one piece of building a real-time data platform. If your organization is looking to scale its data and AI infrastructure, I work with companies to design and implement production-ready streaming architectures. Additionally, I offer hiring advisory services to help you find the right engineers who can build and maintain these complex systems.
I hope you found this post helpful. I will continue exploring more features of Flink and Iceberg in the coming posts. If you have any questions, corrections, suggestions or feedback, please feel free to leave a comment below or create an issue on the GitHub repo. I would love to hear from you.
Enjoyed this post? Subscribe for more!
We respect your privacy. Unsubscribe at any time.
